How to Create a Disk Image Using Disk Utility on Mac [Full Guide]
What is a disk image? Actually, it is a copy that can store the same contents and structure of a disk, not only suitable for CD or DVD, but also for various storage devices. It can convert them into a file with the extension .dmg, just like a virtual disk. And the file can be opened after being restored to another hard drive. Whether it is internal or external SSD or HDD, it all can make a disk copy.
It is easy for you to store or back up some important files, using with Disk Image Utility only—the application can access to create a disk image. Apart from that, if you have confidential documents needing to be protected, an option can be offered for you in macOS, encrypting the image file to ensure the security of files.
- How to Create a Disk Image on Mac:
- 1. The Benefits of Using Disk Imaging Backup
- 2. How to Create a Blank DMG File for Storage Quickly
- 3. How to Restore a Disk Image to the Destination Disk
- In Summary
1. The Benefits of Using Disk Imaging Backup
There are a lot of pros to disk imaging. First, it can replicate one system to another computer, no need to set them up separately again. Besides, no physical disk is required because images are saved as files. It is fairly simple to send the files from one Mac to another. And it is still a safe container for files. It provides data protection, file compression and encryption.
2. How to Create a Blank DMG File for Storage Quickly
Once an empty image file has been created, you can drag the folders you want to the disk image file. It can be a volume for storage. When you need to use the files and wish to open them, you can restore the image file on another device or disk after sending the file. Here's how to create.
Step 1: Find and open Disk Utility on your Mac.
Go to Applications folder. Then open Utilities folder and click the Disk Utility icon. Alternatively, type Disk Utility into Spotlight Search to launch it from Finder.
Step 2: Create a new and blank image.
On the Menu bar, choose File and click New Image. Then select Blank Image to store data.
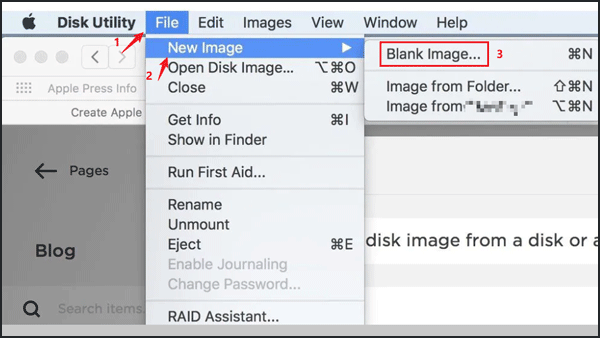
Tips: You can also select Image from “device name.” It supports you to back up the data from connected devices including USB drive as well as internal and external drives.
Step 3: Enter the image's information.
Type the file name and choose where to save it. And enter what size the disk image should be.
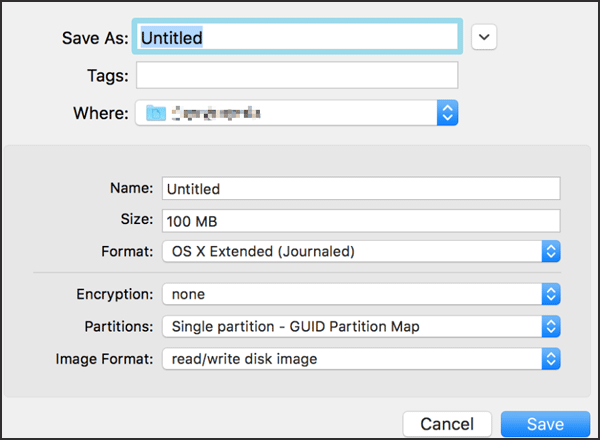
Step 4: Choose the format of the image.
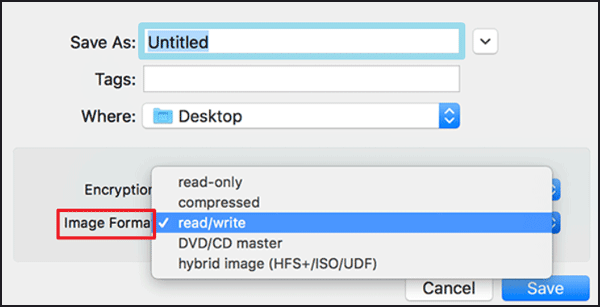
Click the Format pop-up menu:
● You can choose the Encryption option, and set none.
● Set the number and size of Partitions in the disk image.
●Then choose read/write disk image (it allows you to add other files to the image file after it is created with a .dmg file extension).
Tips: If you set more than one partition, you need to restore them one by one. And for safety, you can encrypt the disk image, picking a type of encryption and then setting a password (don't forget the password or you won't be able to open it).
Step 5: After that, select Save, then click Done. It will appear where you saved it in the Finder later.
3. How to Restore a Disk Image to the Destination Disk
Everything in the startup disk will be erased, which will become the replica of the image file. You should save the vital files and folders to another volume or storage drive to avoid data loss before performing the restoring process.
Step 1: Open Disk Utility on your Mac. From the sidebar, select the storage disk. All data will be (irreversibly) deleted from the drive that you choose.
Step 2: Then click Restore to start the process. Click Image and then find the disk image file you intend to copy.
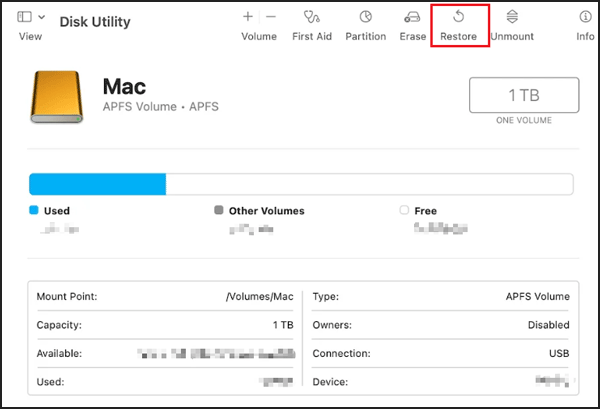
Step 3: Click Open. Then click the Restore button.
Tips: If your image file has multiple partitions, each partition storing corresponding files for each disk, you should first partition the target disk by hitting the Partition button and then restore each volume individually.
In Summary
In fact, whether it is a Windows computer or an Apple computer, its system has its own backup feature without downloading other apps. You may as well have a try because it is exactly a good choice. Choosing to install the third-party backup tool can also solve your problem, a kind of direct and effective way. Above all, when needing a backup or clone of a Mac drive, it is a must to prevent loss of data.

