How to Move Boot Partition to SSD in Windows 10
"My computer is running slower and slower, and the message of insufficient storage space pops up all the time, which makes me very crazy. I want to upgrade my system drive to SSD. Is there any way to help me? What should I do?"
It is a normal phenomenon that the computer has insufficient space after a long time using so that it runs slowly. To solve this problem, you can add a new hard disk, such as SSD to your computer and then copy your boot partition to SSD.
This is an easy way to upgrade your computer to SSD without reinstalling the system. Continue reading, this passage will guide you how to move boot partition to SSD.
- Quick guide
- Part-1: How to install a new SSD
- Part-2: How to move boot partition to SSD
- Part-3: How to set installed SSD as boot disk
Part-1: How to install a new SSD
It is better for you to buy an SSD suitable for your computer, install it on the host according to the installation manual, and start the computer after the installation is complete. If your computer only supports one disk, you can clone whole HDD to a larger SSD.
In order for your computer to use the SSD normally, you need to initialize the SSD and create partitions.
Launch your computer, open the computer management, choose Disk Management and a prompt box initializing the disk will automatically pop up. Choose the option that matches your system partition style and click "OK" to initialize your SSD. After that, you need to right click the unallocated space and create new simple volume. In this way, the allocated partition can be used for the cloning.

Part-2: How to move boot partition to SSD
If you want to move boot partition to SSD repaidly and securely, Cocosenor Backup Tuner is a best choice. Download and install the Cocosenor Backup Tuner.
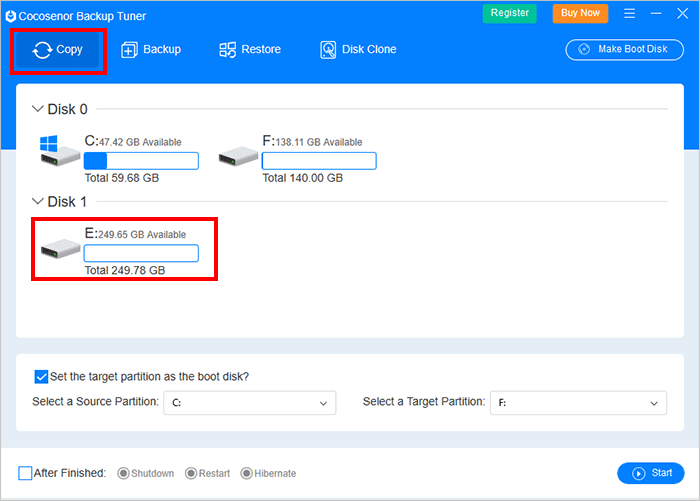
Step-1: Start Cocosenor Backup Tuner and you will directly enter the copy page.It displays all of the disks in your computer, and you can see that the newly installed SSD is also among them.

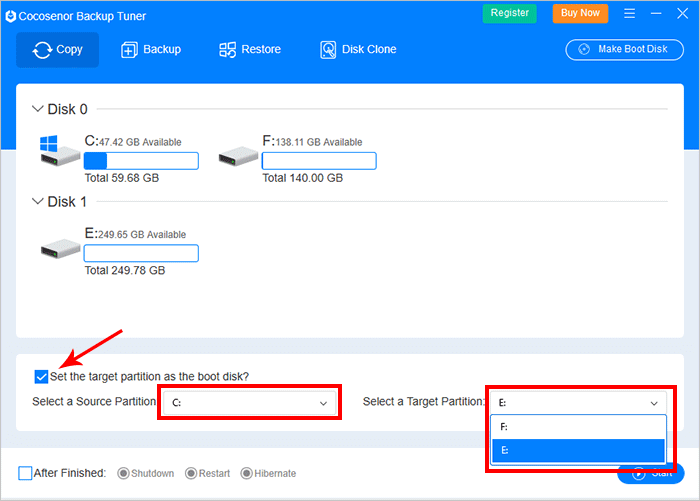
Step-2: Now you just need to choose the boot partition (usually is C) as the source partition and select the SSD volume you just created as the target partition. You need to pay attention to this option -- set the target partition as the boot disk. It is usually checked by default when you select the system dirve, which will make your target partition bootable after cloning.

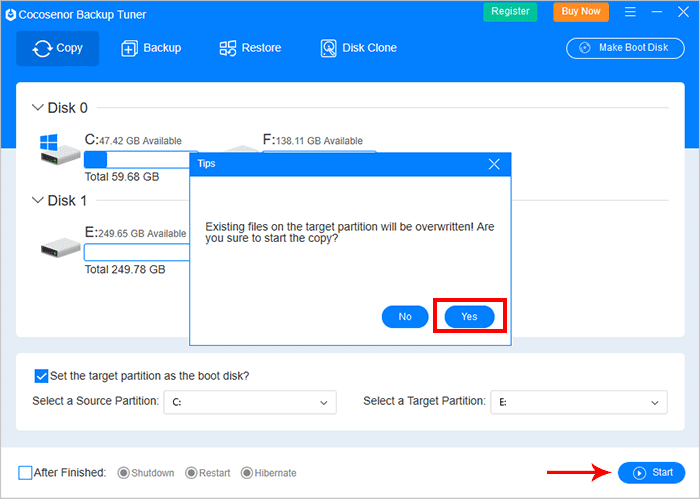
Step-3: Click "Start", a prompt box will pop up to remind you that your target partition data will be overwritten. Your target partition is new so you can ignore it and click "Yes" to continue.

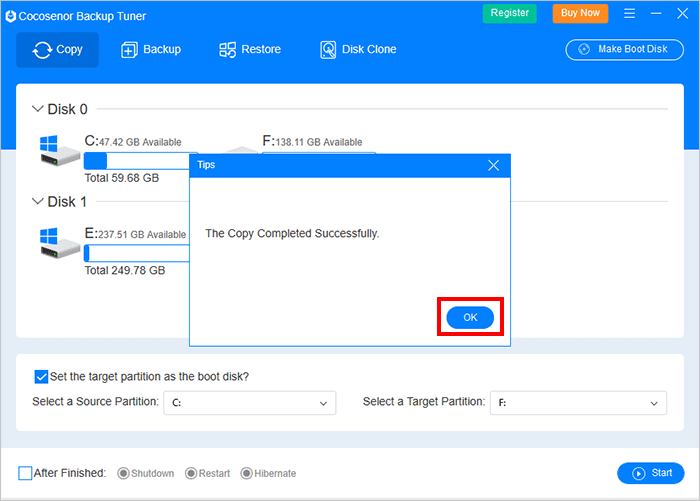
Step-4: After waiting for a while, you will see a prompt box indicating that the copy is successful, and then you just need to click "OK" to end cloning.

All data on the boot partition has been successfully copied to the SSD, you can close the Cocosenor Backup Tuner and go to the next part.
Part-3: How to set installed SSD as boot disk
About changing the original boot partition to SSD, follow the four steps below :
- 1. Restart the computer, press F2 to enter the BIOS interface.
- 2. Enter the BIOS interface and select the boot option.
- 3. Adjust the SSD option for the first boot.
- 4. Restart the computer and it will boot from the SSD.
Tips:
- Bios boot key in different brands of computers isdifferent. F2 button is the most common one.
- The BIOS interface is different, remember to find the option of boot name.
The above is the entire process of moving the boot partition to the SSD. After completing it, you can enjoy a faster working environment.

