How to Clone Western Digital HDD to SSD in Windows 10/8/7

Western Digital (WD) hard drives have earned a good reputation among a lot of Windows users. Well, are you using a Western Digital hard drive or have you ever used a Western Digital hard drive on your Windows computer? Due to certain particular reasons, sometimes you may have the need to migrate data from Western Digital hard drive to another different hard drive, such as from Western Digital HDD to a new SSD. Then the operation of Western Digital data migration occurs. To ensure all the data (including the operating system, configuration settings, applications, files and other personal data) are completely transferred from the Western Digital HDD to that SSD, you'd better directly clone the Western Digital HDD to the SSD in your Windows computer. This is what we are going to talk about in this article.
Part 1: Why Clone Western Digital HDD to SSD
Under what circumstance or for what reason will you want to clone Western Digital HDD to a SSD? You may need to clone Western Digital HDD when you want to upgrade the old hard disk to a new one, replace the small Western Digital HDD with a larger SSD to help your PC get better performance, or make a duplication of your Western Digital hard drive in case of data loss. To sum up, two main reasons to clone Western Digital HDD to SSD as below:
1. Hard Drive Data Backup. An old or a failing HDD will face many problems, especially data loss. So if you have stored a lot of important data in your Western Digital HDD, you'd better migrate them to another secure and safe location to make a full data backup. After you have made a full data backup, you will never be afraid of data loss as you can access the backup data anytime you want especially when they get lost or damaged in the original hard drive. So if your Western Digital gets old, you can choose to clone your Western Digital HDD to SSD in order to have a complete backup of data.
2. Hard Drive Upgrade. As we all know, SSD has faster speed and better performance compared with HDD. Based on this point, you may want to replace your old Western Digital HDD to a new SSD or upgrade your small Western Digital HDD to a larger SSD in order to help your computer do a better job. Under this circumstance, you need to clone Western Digital HDD to SSD to get all the data transferred from your original Western Digital HDD to SSD. Hard drive upgrade is very necessary when your original hard drive is going to fail or outdated.
Part 2: How to Clone Western Digital HDD to SSD
Obviously, you need a professional cloning tool to do Western Digital data migration for you. Although you can get all kinds of disk cloning tool online, it is hard to do a choice. Have you ever heard of Cocosenor Backup Tuner? Cocosenor Backup Tuner is a mature Windows disk clone software which can help you clone an entire Western Digital HDD to SSD in only a few steps. Now follow the below steps to learn how to clone Western Digital HDD to SSD in Windows 10/8/7 with Cocosenor Backup Tuner.
Step 1: Connect, initialize, and allocate the new SSD in your computer.
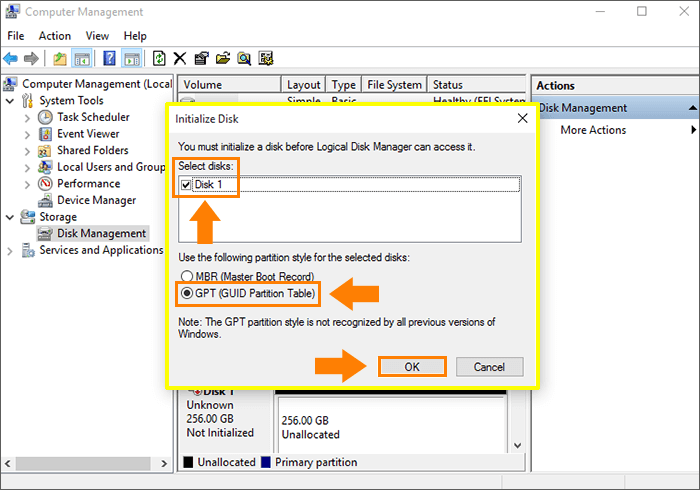
Prepare a new SSD with larger space than your original Western Digital HDD and connect the SSD to your Windows computer. To make the new SSD detected by your computer, you need go to Disk Management to initialize the new SSD with a partition style.

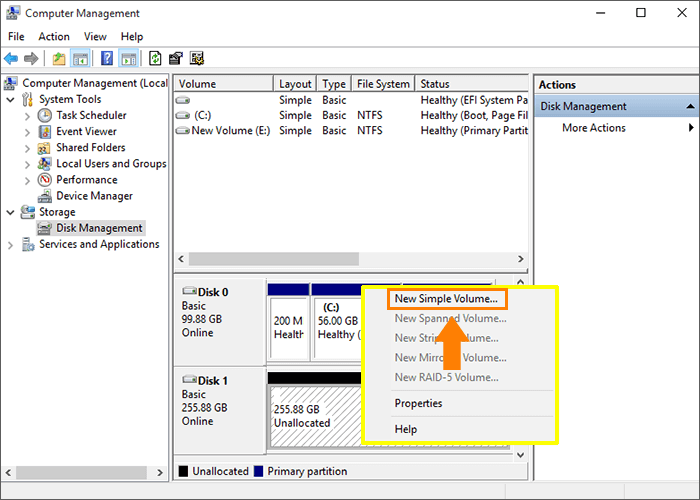
By now, the SSD is still unallocated. You need right click anywhere on the unallocated space and choose the option of New Simple Volume and then follow the New Simple Volume Wizard to create a simple volume on the SSD disk.

Step 2: Download Backup Tuner, open it and choose the Disk Clone function.
Have the software of Cocosenor Backup Tuner downloaded on your Windows computer. After you install it properly, you can start the software. You can see there are four main functions on the top list. To clone Western Digital HDD to SSD, you need choose the function of Disk Clone.

Step 3: Set Western Digital HDD as source disk and SSD as target disk.
You can see the Western Digital HDD and the newly connected SSD are displayed on the Disk Clone interface. Then you need to choose the Western Digital HDD as the source disk and choose the SSD as target disk to receive all the data cloned from the Western Digital HDD.

Step 4: Confirm to start to clone Western Digital HDD to SSD.
After you have set the source disk and target disk, now you can click the Start button to proceed. Then you will get a popup tips window to ask for your confirmation. To confirm to clone Western Digital HDD to SSD, click the Yes button on the tips window to continue.

Step 5: Wait for the Western Digital HDD cloned to the SSD successfully.
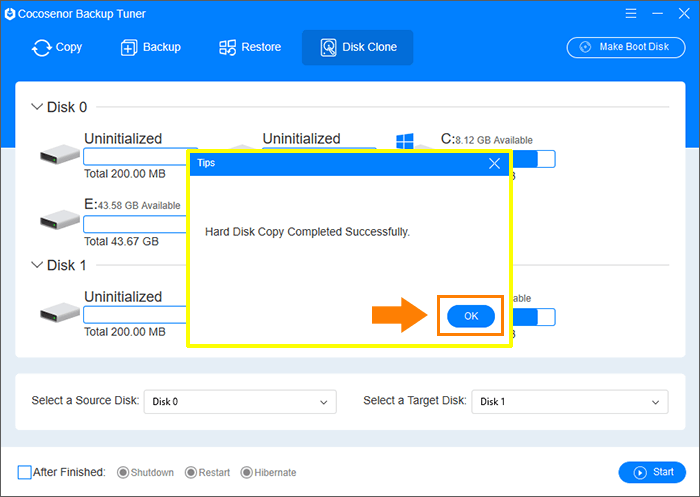
It will take some time to finish this process. As for how long it will take to complete, it depends on the size of data that need to clone from the Western Digital HDD cloned to the SSD. Once you start the cloning process, you need just wait for the process to finish patiently. Then you will get the Western Digital HDD cloned to the SSD successfully.


