[4 Options] How to Disable Superfetch/Prefetch in Windows 10

Superfetch (also known as SysMain or Prefetch) is a useful Windows system service which is responsible for maintaining and improving system performance over time. It attempts to make your Windows boot faster and shorten the amount of time it takes to launch applications by caching files and data that are needed by them into memory in advance so that they can be accessed quicker when needed.
However, sometimes Superfetch can become one of the main factors to cause the issue of high disk usage of your computer and has negative influence on your PC performance. In that case, it is suggested to disable Superfetch in your computer. This article will provide 4 easy and effective options for you to disable Superfetch/Prefetch in Windows 10.
- Fixed - How to Disable Superfetch in Windows 10
- Option 1: Disable Superfetch in Windows 10 from the Services App
- Option 2: Disable Superfetch in Windows 10 using Command Prompt
- Option 3: Disable Superfetch in Windows 10 through Registry Editor
- Option 4: Disable Superfetch in Windows 10 with Cocosenor System Tuner
Option 1: Disable Superfetch in Windows 10 from the Services App
Step 1: Launch the Services app.
Click the Start icon button in the lower left corner of your computer interface, type the text of “Services” without quotes into the Windows search bar, and then click the Services app from the list of results in order to launch it.

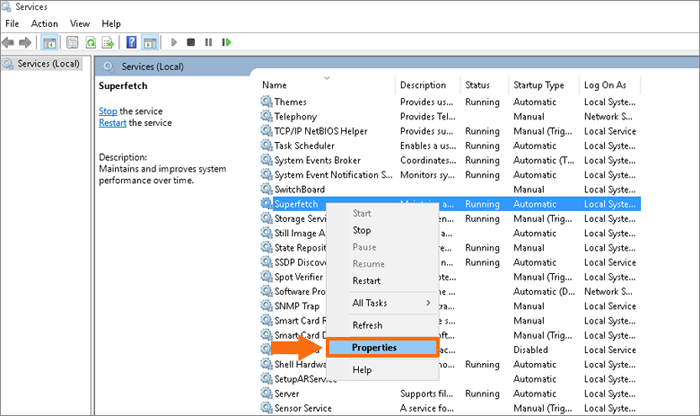
Step 2: Open Superfetch Properties.
After you open the Services app, you will see list of Windows system services is displayed on the interface. In order to disable Superfetch in your Windows 10 computer, you should find it first of all. So scroll down the page and browse to the service of Superfetch from the Name column and then right-click it and choose Properties to open the Superfetch Properties panel.
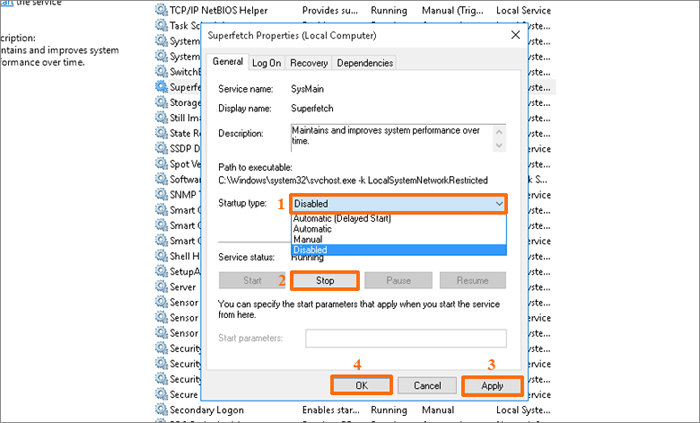
Step 3: Disable the Superfetch service.
In the Superfetch Properties panel, click the down arrow icon to expand the startup type drop-down menu, select the choice of Disabled, and then tap the Stop button to make the service status from running to stopped. Then click the Apply button and the OK button to save changed. After that, the Superfetch service will be disabled in Windows 10 successfully.
Option 2: Disable Superfetch in Windows 10 using Command Prompt
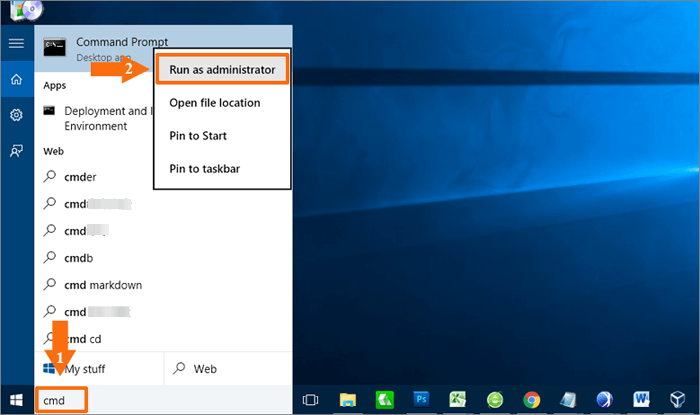
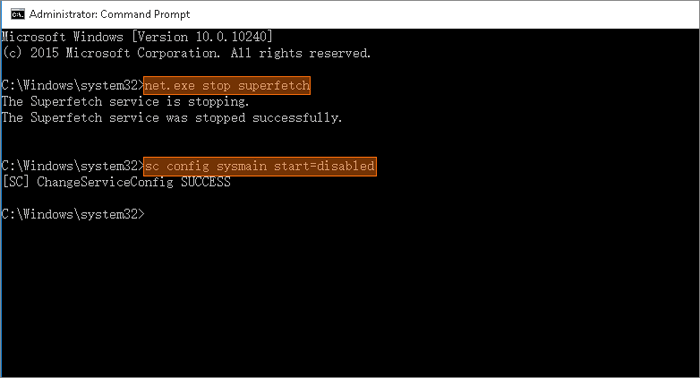
Step 1: Run Command Prompt as Admin.
Click the Start icon button on your computer interface, enter cmd into the Windows search blank, right-click the result of Command Prompt and choose the option of Run as administrator from the menu.
Step 2: Execute commands to turn off Superfetch.
Now that you have opened the command prompt window, it’s time to run corresponding commands to disable the Superfetch service. Copy and paste the command of “net.exe stop superfetch” without quotes and press the Enter key to run it, followed by the command of “sc config sysmain start=disabled”. And then you will have the Superfetch service turned off in your computer. Now you can close the Command Prompt.
Option 3: Disable Superfetch in Windows 10 through Registry Editor
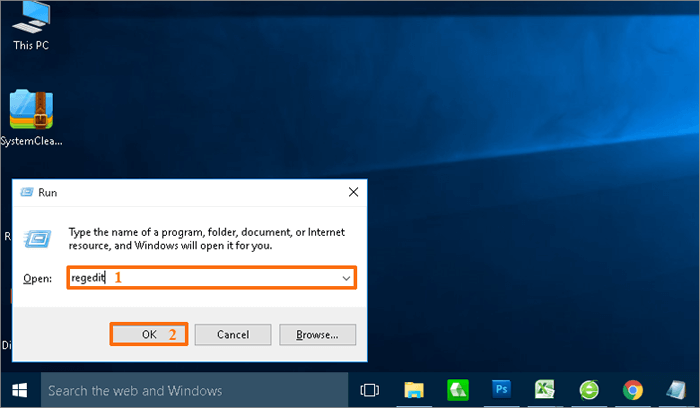
Step 1: Open the Registry Editor window.
Press and hold the the Windows key and the R key on the keyboard at the same time to invoke the Run dialog box (or you can right-click the Start icon button from the lower-left corner directly and select Run). Type regedit in the blank and tap OK to open the Registry Editor app.
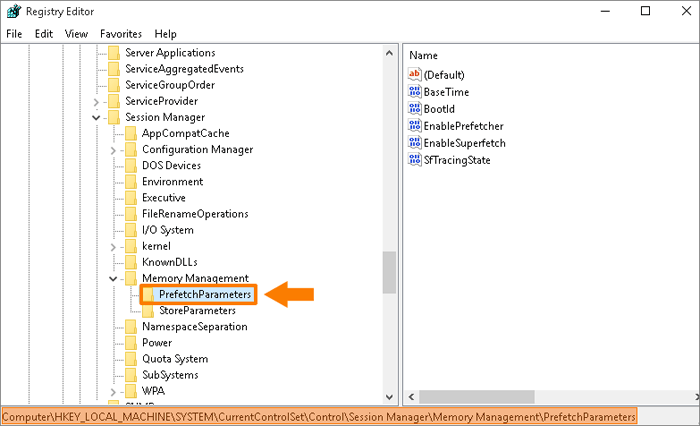
Step 2: Go to the PrefetchParameters key.
When you open the Registry Editor, navigate to the following address by using the left sidebar and then continue with Step 3.
Computer \ HKEY_LOCAL_MACHINE \ SYSTEM \ CurrentControlSet \ Control \ Session Manager \ MemoryManagement \ PrefetchParameters
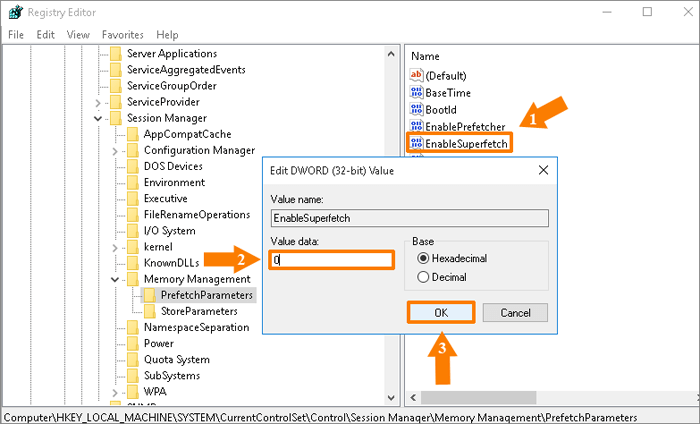
Step 3: Turn off Superfetch by changing the Value data to 0.
In the right panel, double click the key of EnableSuperfetch in order to edit it. You can see its current value data is 3. To disable Superfetch, change Value Data to 0 and then click the button OK to save changes.
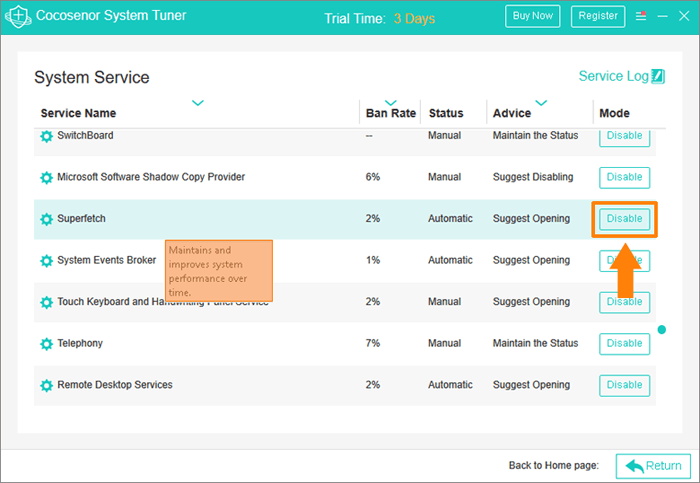
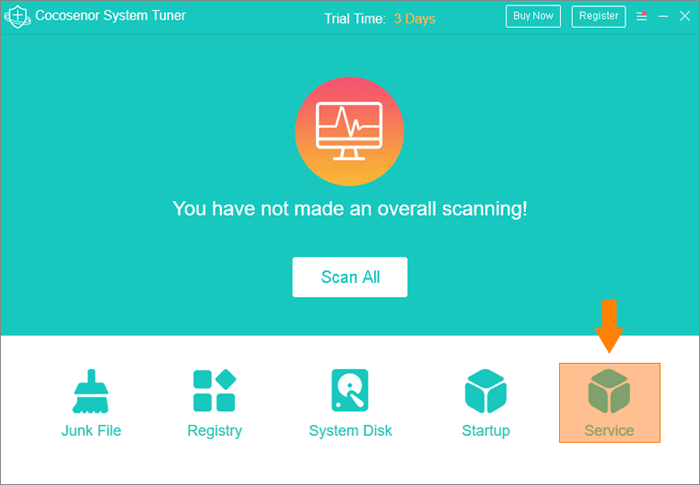
Option 4: Disable Superfetch in Windows 10 with Cocosenor System Tuner
Step 1: Install Cocosenor System Tuner in your PC.
You can also use a third-party utility to help you disable or enable different Windows system services, including the service of Superfecth. Cocosenor System Tuner is such a very appropriate choice. You can make full use of it to turn off Prefetch in Windows 10 very quickly. So first of all, download and install it in your computer and have a free trial right now!
Step 2: Disable Superfetch with a button.
After you have downloaded and installed Cocosenor System Tuner in your computer, launch the software and select the function of Service from the bottom menu bar.
And on the System Service interface, scroll down the page and find the service name of Superfetch. Then click the Disable button to turn off it.