How to Retrieve Deleted Files from a Hard Drive on Windows 10
A hard drive is a component that stores data. It’s commonly used as an embedded part of a computer and external storage. But when you intentionally or accidentally delete some files on the hard drive, is there any way to retrieve them?
Of course, you can. Exactly, in this article, we are going to represent you how to retrieve deleted files from a hard drive on the Windows 10 PC.
- Retrieve Deleted Files from a Hard Drive on Windows 10
- Why Deleted Data from Hard Disk could be Recovered
- How to Retrieve Deleted Files from Hard Drive:
- Case 1: Shift delete files on the hard drive
- Case 2: Recycle Bin is emptied on the hard drive
- Case 3: Delete files from external hard drives
Why Deleted Data from Hard Disk could be Recovered?
It’s because data deleted from a hard disk is just deleted but not erased.
Since erasing data takes significantly longer time than deleting, hard disks are designed to merely delete data for better performance.
Simply deleting data is a process to delete the pointers that mark where the storage begins and ends and mark the space as accessible, at the meantime, leave deleted data there, in the free space, waiting to be overwritten by new content.
So, as long as the deleted data isn’t overwritten, there’s still a big chance to recover it from the hard disk.
How to Retrieve Deleted Files from a Hard Drive
It varies. Below are the situations that you can directly restore the deleted files from Recycle Bin:
- 1. Delete files by pressing Ctrl + D;
- 2. Delete files by right-clicking it and select “Delete”.
Under these circumstances, you can retrieve these deleted files from Recycle Bin and they will be restored to the original location in which they were stored.
But for the following situations, you had better take advantage of professional data recovery tools:
- 1. Delete files on the hard drive by pressing Shift + D;
- 2. Delete files from the hard drive and then empty the Recycle Bin;
- 3. Delete data from some external hard drives (Files deleted from an external hard drive will not go to Recycle Bin).
In these cases what most people will encounter, we suggest you a professional data recovery software – Cocosenor DataTuner. It could largely help and significantly raise the success rate of recovery.
From the very beginning, you need to download and install Cocosenor DataTuner on your Windows 10 computer. Then, launch it after installation is completed.
Case 1: Shift delete files on the hard drive
Instance: I used Shift + Delete group key to delete some files under the folder in this path on the hard drive: D:\coco-files.
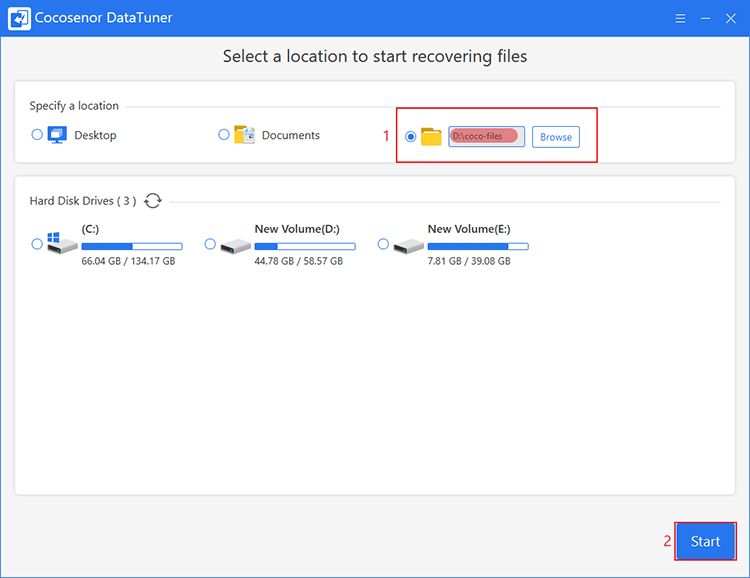
Step 1: Specify a location from which you shift-deleted the files and start scanning.
Specify the file location on the hard drive and click Start on the right bottom corner.
Tip: If you don't remember the exact location, try to recall that in which drive it was kept and select to scan the drive.
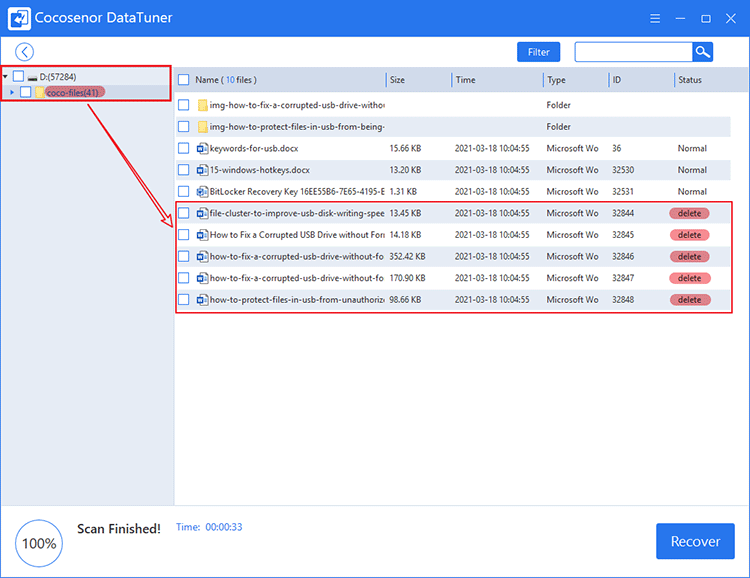
Step 2: After scanning, choose the specific folder to look for deleted files you want to recover.
Click on the folder on the left pane, you can see the details inside of the folder on the right pane, where is also you can find the deleted files that need to be recovered.
Step 3: Check-select the deleted files and recover them.
Check-select the boxes in front of names of deleted files that need recovery and then click Recover.
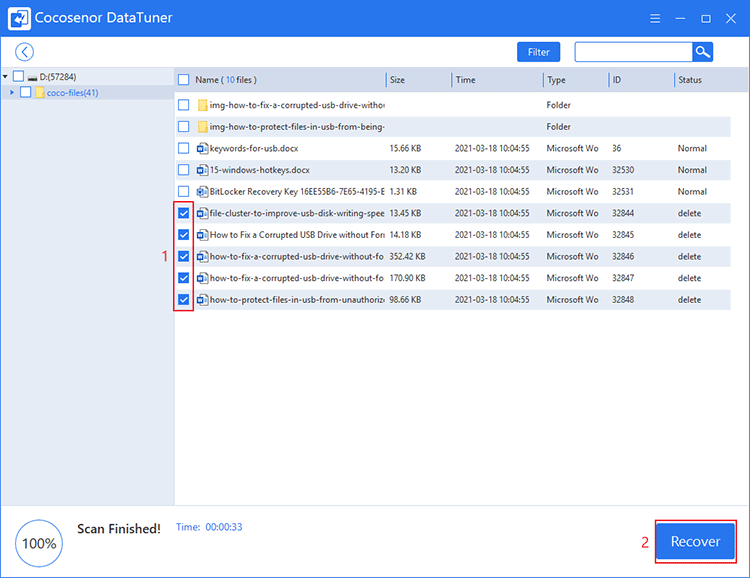
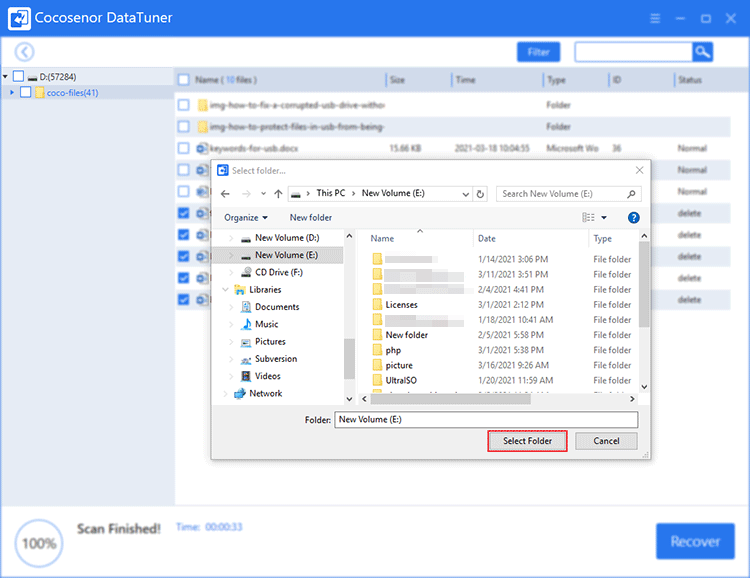
Select a safe location to restore the deleted files but not the original one.
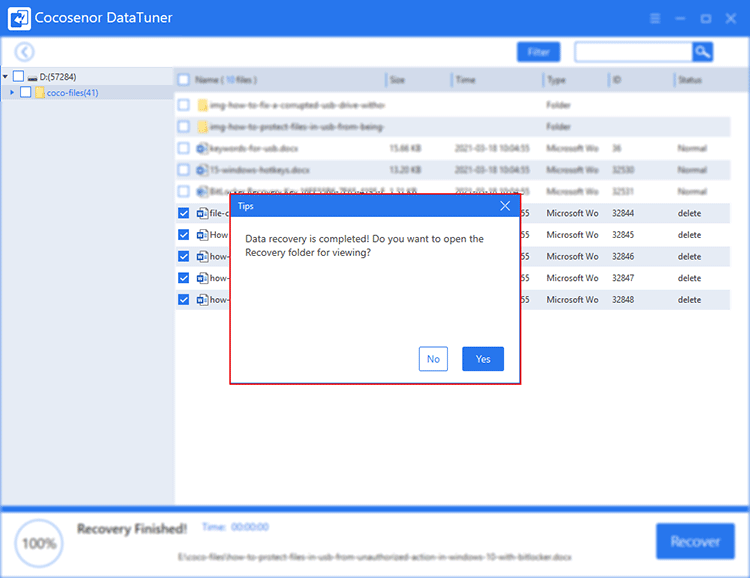
After recovery, you can choose to view the recovery folder or just exit the software if you think you’re good.
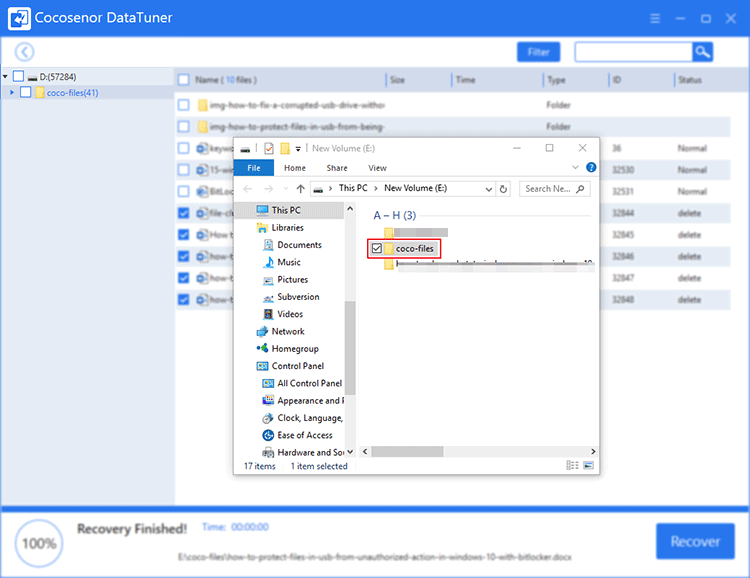
The recovery folder containing the recovered files will be named the same as the original folder where the deleted files were saved.
Case 2: Recycle Bin is emptied on the hard drive
Instance: I simply deleted some files under the folder in this path on the hard drive: E:\coco-files. And then I emptied Recycle Bin.
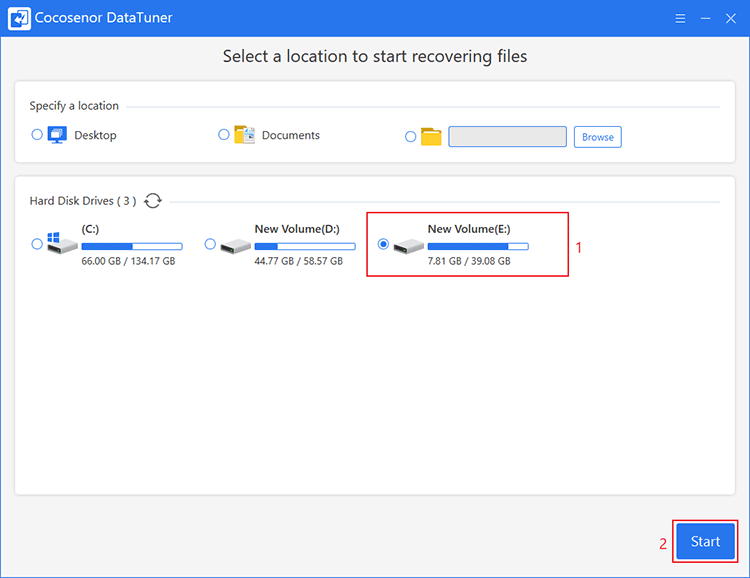
Step 1: Select the hard drive and start scanning.
If there are some partitions on the hard drive, you can choose the exact one where the deleted files originally were. In this case, I choose Partition E of the hard drive to scan.
Step 2: After scanning, choose the folder named “$RECYCLE.BIN” on the left pane.
Click the “$RECYCLE.BIN” folder on the left, you can access to view the files under this folder on the right pane. They are the deleted files that were first moved to and then got kicked out of the Recycle Bin from E drive.
The names of these files might differ from previous ones. Thus, you need to identify the deleted files by Size, Time (when it got deleted) and Type.
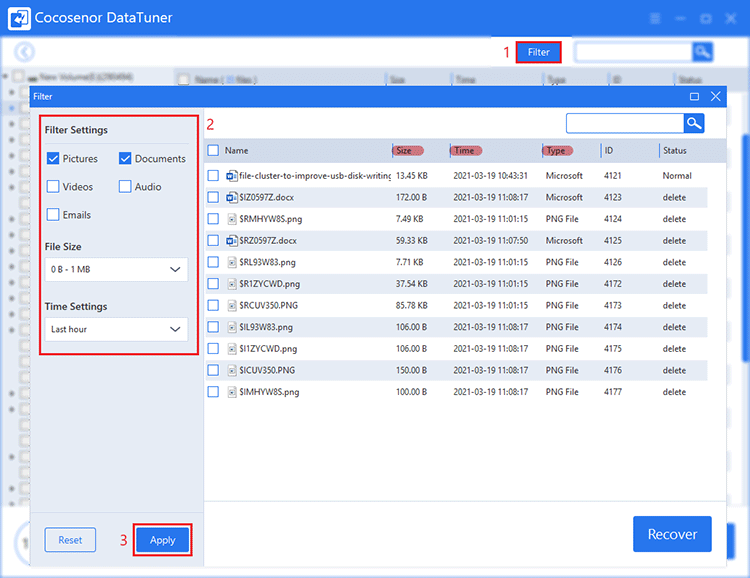
If you couldn’t find the files during scanning, then it’s recommended to give a shot to Filter feature after scanning.
Tell the software what you are looking for: documents or pictures, the file was deleted in last hour or last 7 days and so on. The more information you provide, this feature works more efficiently.
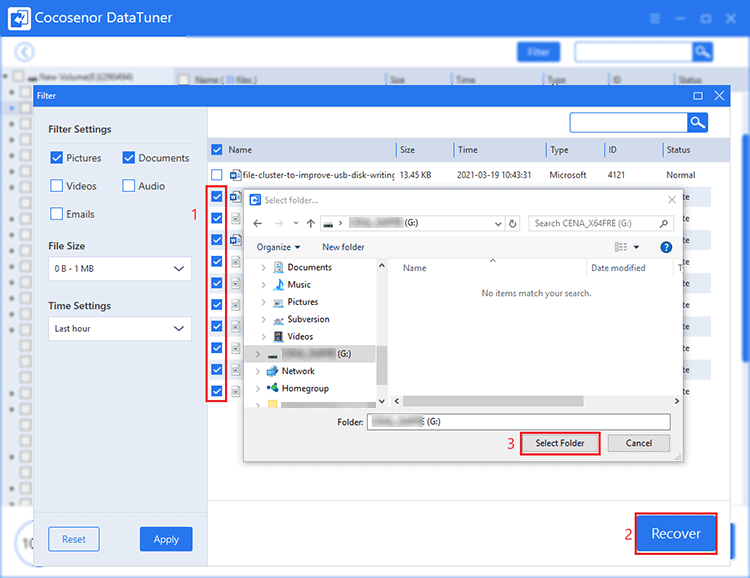
Step 3: Recover deleted files from the hard drive partition.
Check-select the deleted files that you want to recover and click Recover. Choose a safe location but not the original one to save the recovered files.
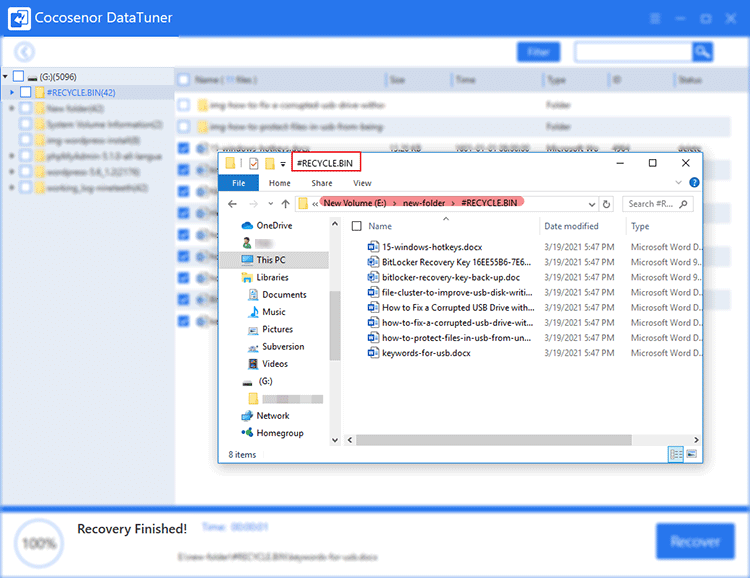
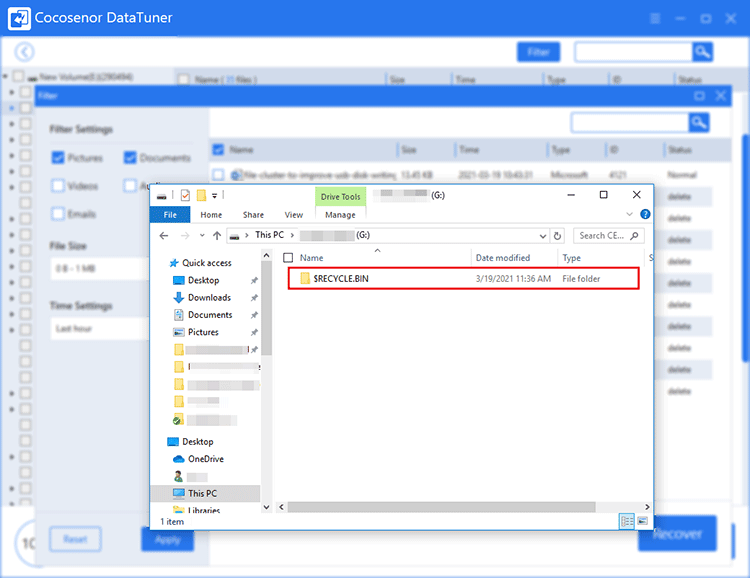
The recovered files will be saved in a folder named “$RECYCLE.BIN” created by software in the location you just chose.
Case 3: Delete files from external hard drives
Instance: I deleted files from an external hard drive which will bypass Recycle Bin and will not be detected by Windows 10 operating system.
Step 1: Connect the external hard drive to Windows 10 computer.
Step 2: Choose the external hard drive to scan.
Select the external hard drive and click Start.
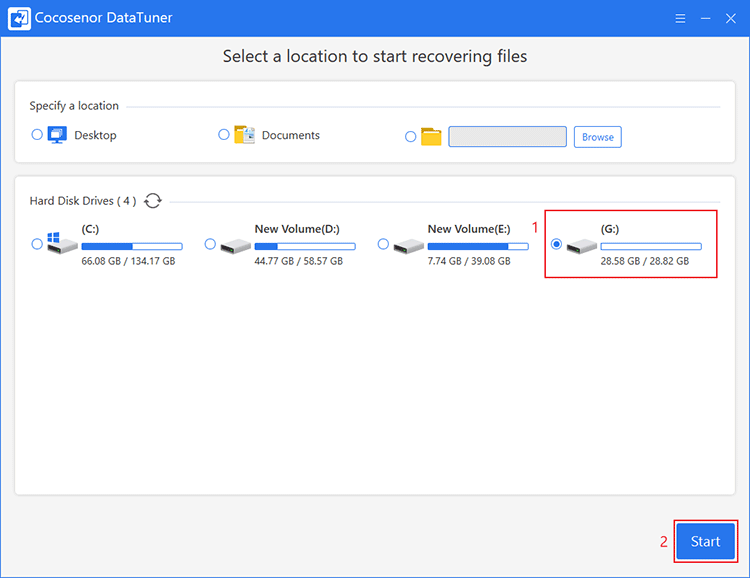
If you can recall the original folder in which the deleted files were kept, you can choose to specify that folder to scan.
Step 3: Look for the deleted files you want to recover.
You can start looking for it during scanning. The files that are deleted will appear in the RECYCLE.BIN folder. Click “#RECYCLE.BIN” (It may be “$RECYCLE.BIN” in your computer) on the left pane and check the details on the right pane.
It may also appear the original folder from which the files were deleted. If you can recall which folder it is, you can go to check that folder, too.
If you find the files you need, it’s all right to click Stop on the left bottom corner to stop scanning.
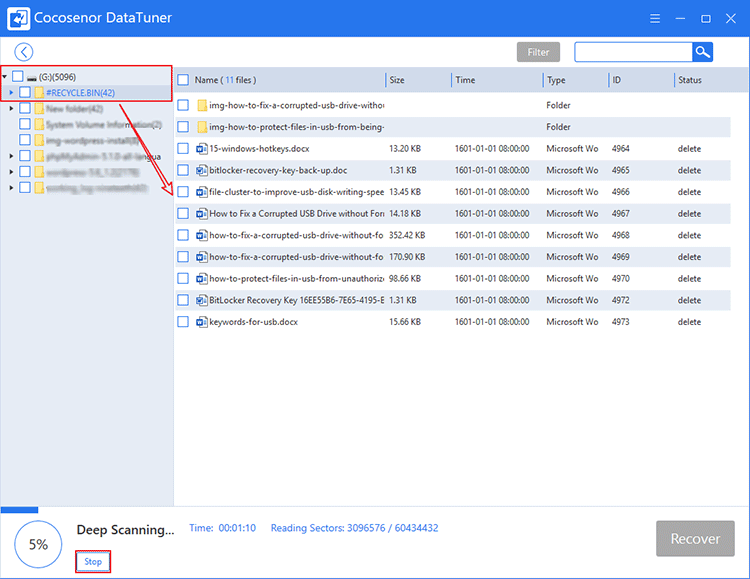
Likewise, if you couldn’t find the files you want, take advantage of Filter.
Step 4: Recover deleted files from the external hard drive.
Check-select the deleted files, click Recover, and choose a folder to store the recovered files.
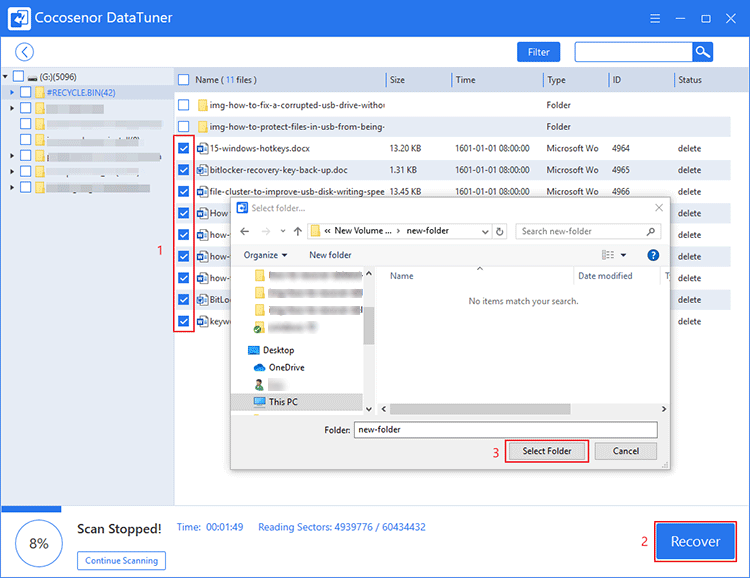
The recovered files will be saved in a folder named the same as the folder from where they are recovered – in this case, it is “#RECYCLE.BIN” – created by DataTuner under the directory you just chose.
