Backup on Windows 10 System – 5 Methods to Choose

"Do I need to backup on my Windows 10 system?"
Yes. Backup on your computer system is of great importance for you. With the backup file of your system, you can restore your files or system when meeting problems on your PC device.
On different versions of system, the methods to backup are various. Here in this article will show you 5 ways to back up on Windows 10 system. Take a minute to read about them, and choose the appropriate one to do a backup on your Windows 10 device to reduce data lost.
- Guide Steps:
- Method 1: Backup with File History
- Method 2: Back up Windows 10 system to a restore point
- Method 3: Full backup Windows 10 to a system image file
- Method 4: Create Windows 10 recovery disk with a USB/DVD
- Method 5: Back up with cloud
Method 1: Backup with File History
If you only back up some important files on your Windows 10 PC, choose this method.
Tips: The file history will be created on an external drive or network, if do not back up to network, make sure there is an external drive (USB drive) connected to your PC device.
Step 1: If create File History on a USB drive, insert the USB drive into your PC device.
Step 2: Log into Windows 10, click on Start → Settings → Update & Security → Backup → Add a drive.
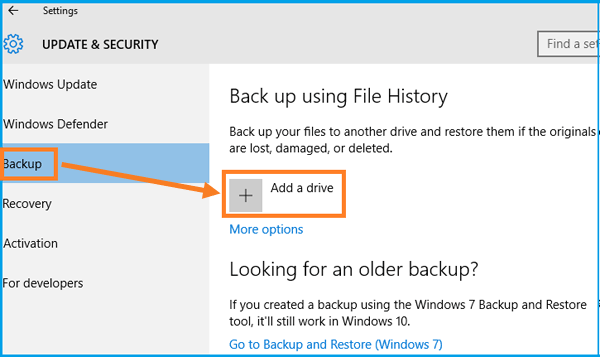
Step 3: If do not see the Add a drive button, below Automatically back up my files, turn the button to On.
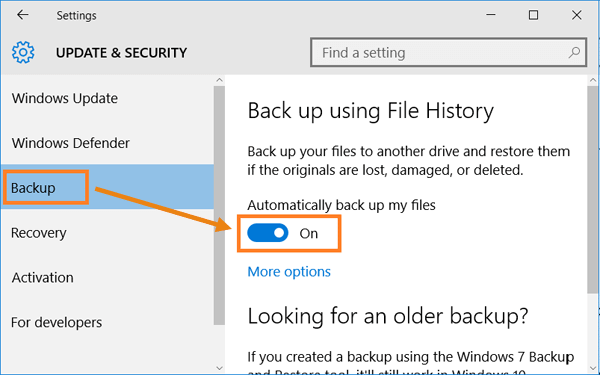
Step 4: And then the FileHistory folder is created on your USB drive.
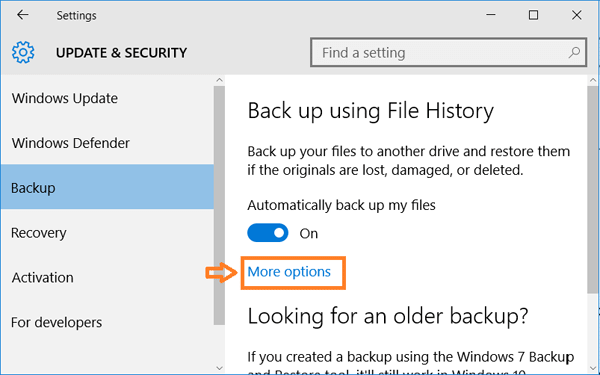
Step 5: Click on More options.
If it prompts you that your data is not yet backed up,click on Back up now button, the files listed below will be backed up to your USB drive.
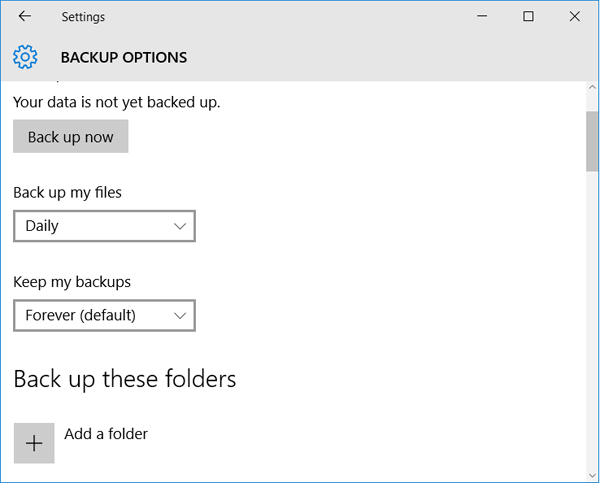
Below Back up my files, you can choose the time how often to back up your files.
Below Keep my backups, you can choose the time how long to keep your backups.
Below Back up these folders, click on Add a folder button, you can select the other folders to back up on your USB drive.
Below Exclude these folders, click on Add a folder, you can choose the folders don't want to be backed up on USB drive.
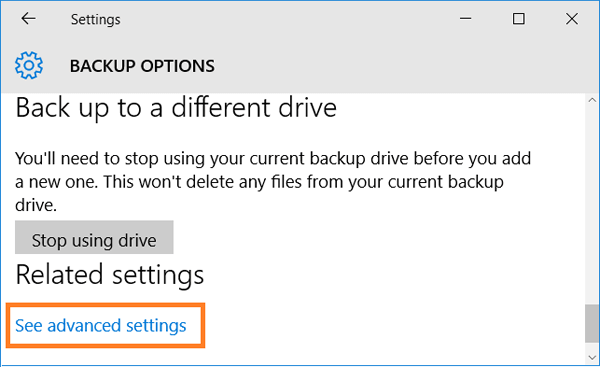
Click on See advanced settings.
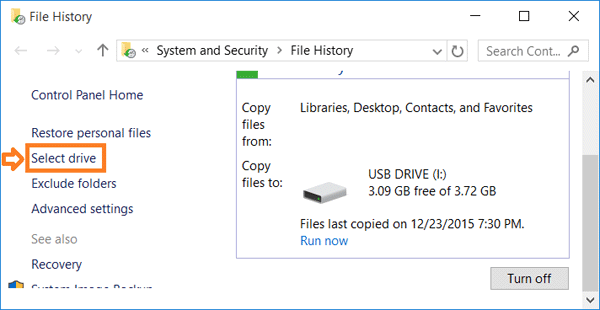
Click on Select drive.
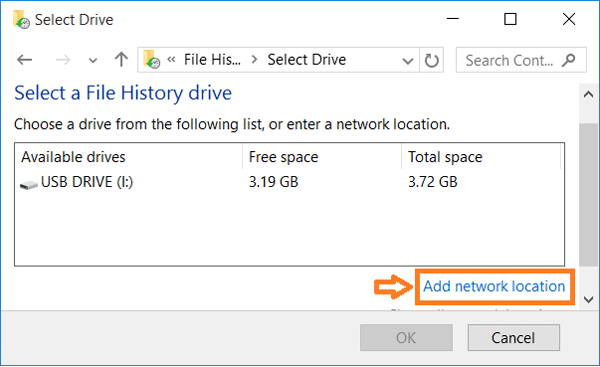
Click on Add network location to store your backups to a network location.
The limit of this method: It only backs up the files located in your user account's libraries.
The advantage of this method: Once you setup the back-up, Windows will automatically create copies of your files. You can use it to recover your files when they are lost or ruined. Use it to restore a single file or roll back to an older version.
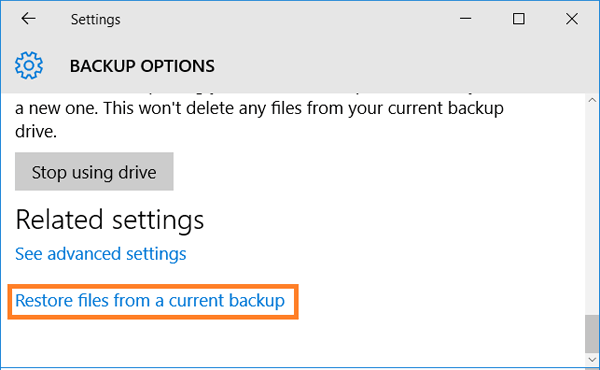
If want to restore files, go to the Backup Options, on the bottom, click on the link Restore files from a current backup.
Method 2: Back up Windows 10 system to a restore point
Before and after Windows 10 update, installation of software or drives on your computer, creating a restore point is a good idea. With the restore point, you can rollback to the previous point of system.
Step 1: Get into Windows 10, on the desktop, right-click on This PC, select Properties.
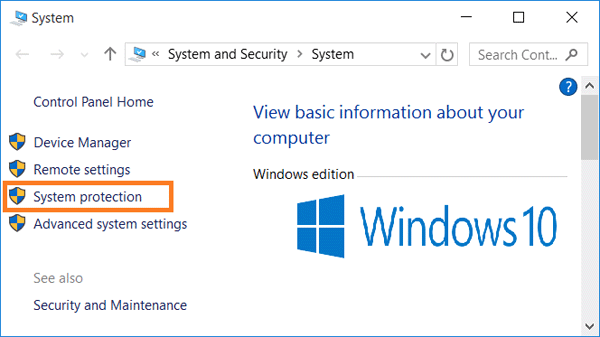
Step 2: Click on System protection.
Step 3: If haven't turned on the System Restore function, click on Configure.
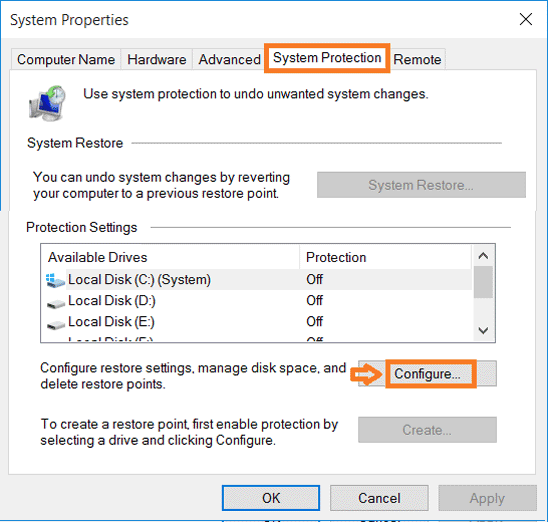
Step 4: Select Turn on system protection, and click on OK.
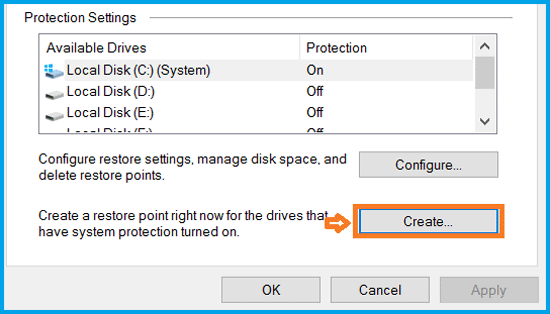
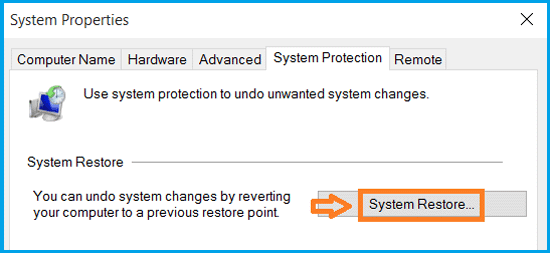
Step 5: Go back to the System Properties page, you will find the Create button below Configure is enabled. Click on Create.
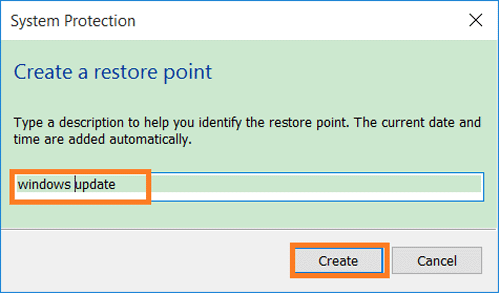
Step 6: Type a description to help you identify the restore point, click on Create button. The process of creating restore point for your Windows 10 begins.
If want to revert your computer back to a previous restore point, click on System Restore button.
Method 3: Full backup Windows 10 to a system image file
Before doing a clean install of Windows 10 on your PC, you had better create an entire image of your system, which includes your operating system, installed apps, settings, and personal files.
Step 1: Right-click on Start, select Control Panel.
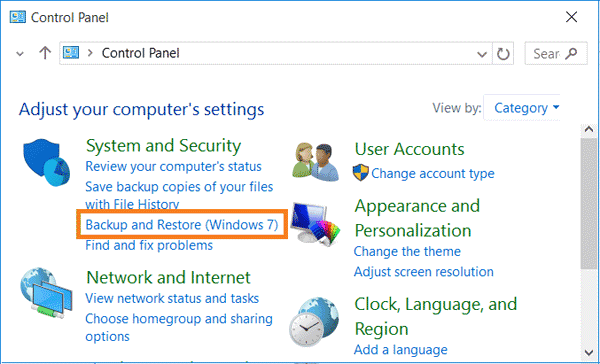
Step 2: Under System and Security, select Backup and Restore (Windows 7).
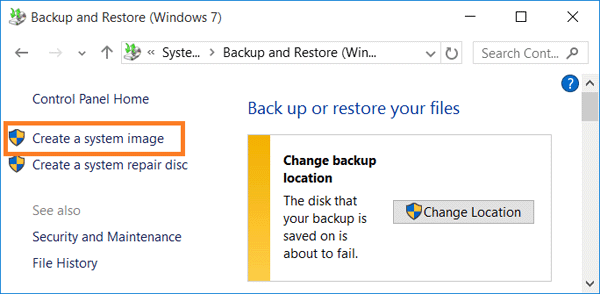
Step 3: Select Create a system image.
Step 4: Select the place where to save your system image backup, click on Next.
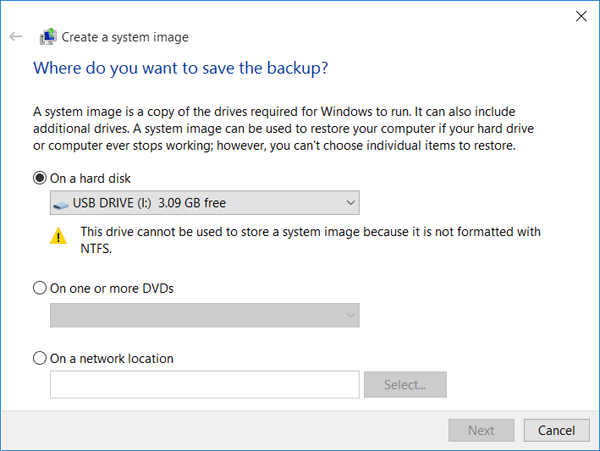
These backups can be stored on the hard drive disk of your computer or external hard drive like USB disk, on one or more DVDs, or on a network location.
The disadvantage of system image backup: It will take up a large amount of storage space. And you can't choose individual items to restore.
The advantage of system image backup: When get problems during the installation, you still can go back to the previous state of Windows with the Windows 10 system image backup.
Or when your hard drive or computer stops working, you can use the system image to restore your Windows 10 PC device.
Method 4: Create Windows 10 recovery disk with a USB/DVD
After backing up Windows 10 system image with the method above, you will be prompted to create a system repair disc. You can click on Yes and continue to create a recovery disk of Windows 10 system (This option needs to connect a CD/DVD disc.).
If you do not want to create a system image, and wanting to create a USB recovery drive of Windows 10 individually, follow the steps below.
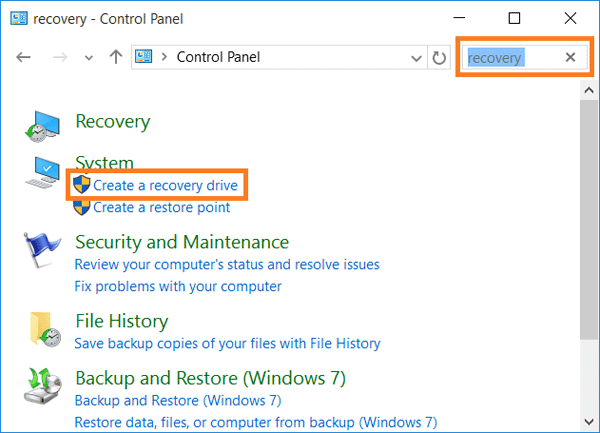
Step 1: Open Control Panel, search: recovery.
A series of back-up tools on Windows 10 will be showed below. Click on Create a recovery drive.
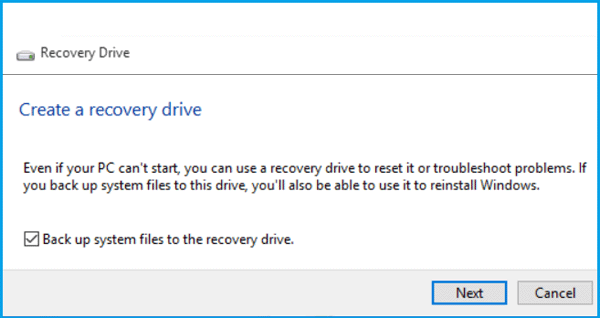
Step 2: Check the "Back up system files to the recovery drive", click on Next.
Step 3: System will analyze your USB flash drive. Wait for a while patiently, and follow the instructions.
Make sure there is enough available storage on your USB drive. (On my PC needs at least 8 GB in size.)
The superiority of creating a Windows 10 recovery drive: Even if your PC device won't start, you can use the recovery drive to reset it and solve problems. You also be able to reinstall Windows with it, if you select the "Back up system files to this drive" option.
Method 5: Back up with cloud
If you do not have an external drive (USB/DVD) to do a system backup on your Windows 10, backing up your data to the cloud drive is a good choice. The benefit of backing up your Windows 10 with Cloud is that you can get the back-up data everywhere with the Microsoft account accessing to OneDrive online. Various kinds of cloud services for you to get online, like Dropbox, OneDrive, or Google Drive. You can get at least 15 GB freely available storage on OneDrive in the first time you sign in. Whenever you need you can expand the storage by the services they provide.
The crux of the backup with Cloud tends to backup all the file/data of the Windows 10 OS to be a single backup file. So that you can upload this single backup file to your cloud drive more convenient. It's recommended to get Cocosenor Backup Tuner to backup your Windows 10 operating system. Backp Tuner is very professional in backing up/copying disk data and system files. The software is small but powerful enough and the operation is very simple and straightforward. It is definitely a good choice for newcomers to Windows system backup.
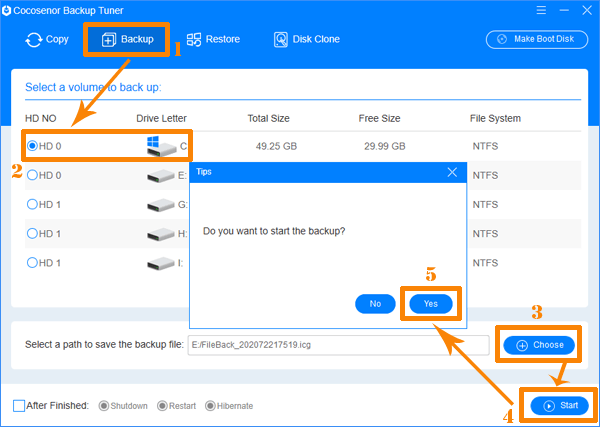
1. Download and install the Backup Tuner. Launch it and click the Backup tap in the left side of the interface.
2. Select your Windows 10 system disk volume from the list menu. And then click the Choose button to select a path to save the backup file.
3. Click Start and confirm the notification like the following picture showing. Waiting for the backup mission finished.
4. The backup file of your Windows 10 is right in the path you just saved. Log in to your cloud drive and upload the backup file to cloud.
If you want to restore the backup file, you can make use the function of Restore of the software to do that for you so that you can reuse the data when you need them.
Related Articles
- How to Back Up Windows 7 or 8 System
- Windows 10 System Restore on Surface Pro 4 – 5 Tips to Choose
- Clean Install Windows 10 on Laptop/Desktop PC with A USB Drive
- Install Windows 10 Full Version with Media Creation Tool
- How to Copy One Hard Drive to another Hard Drive in Windows Computer
- How to Clone Windows OS to New HDD/SSD without Reinstalling

