Best 3 Ways to Find and Remove Duplicate Files on Windows PC
Is your computer packed with lots of identical documents? Do you have a hard drive clogged with hundreds of same files? Are you annoyed about the numerous copies in the photo library? Getting too much duplicate files on the computer is far more than just a minor annoyance. These duplicates may be generated without your awareness and all of them come to be useless. As the extra duplicates amass, the hard drive may be cluttered, increasing the difficulties to locate the right file and slowing down the PC. To maintain optimum computer performance, it's a necessity to clear the duplicate files. So, what can we do? Further details on how to find and remove duplicate files are discussed below.
- Contents
- Option 1: Manage the duplicates with File Explorer
- Option 2: Delete the duplicates with PowerShell
- Option 3: Clear the duplicates with Cocosenor Duplicate Tuner
Option 1: Manage the duplicates with File Explorer
Though Windows is not featured with a built-in duplicate finder tool, you can make use of the Search and Preview feature of File Explorer to sort out all the duplicates. Follow these steps to make adjustments for indexing:
Step 1: Type indexing in the search bar and open the Indexing Options.
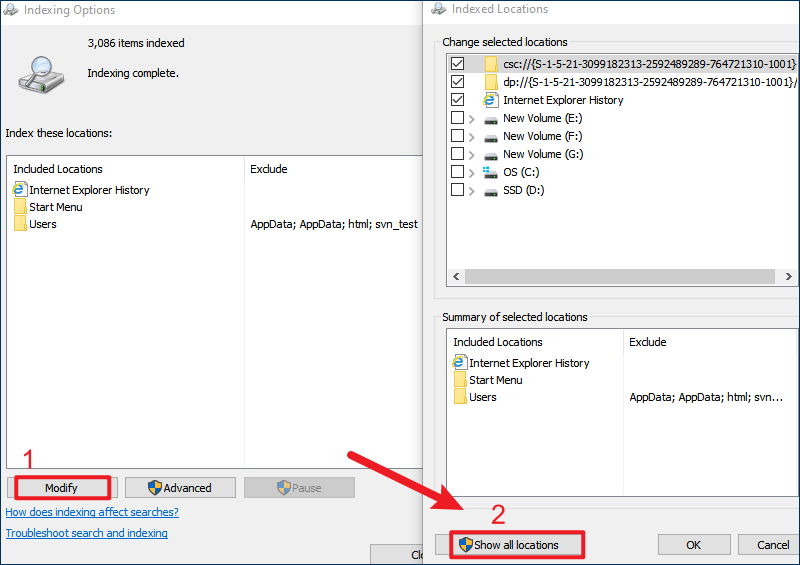
Step 2: Click Modify option at the bottom of the window and then click Show all locations in the next pop-up.
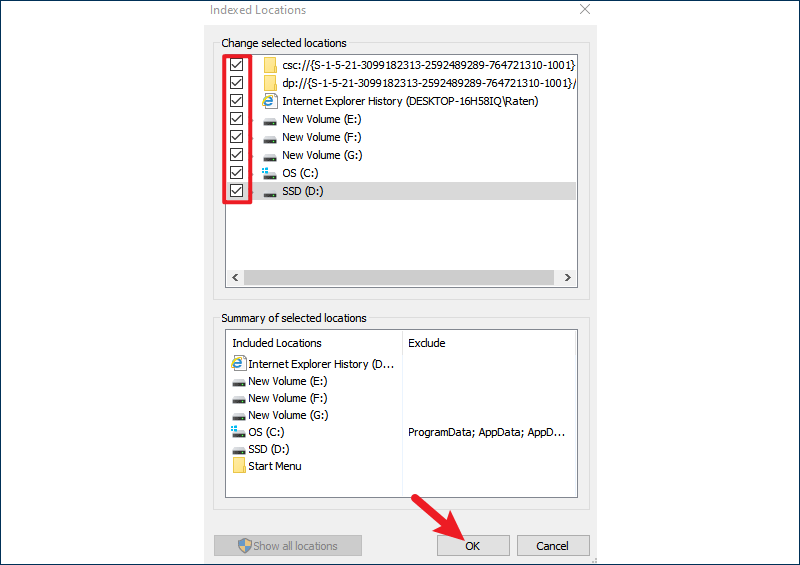
Step 3: Under Change selected locations, tick all the boxes and tap on OK.
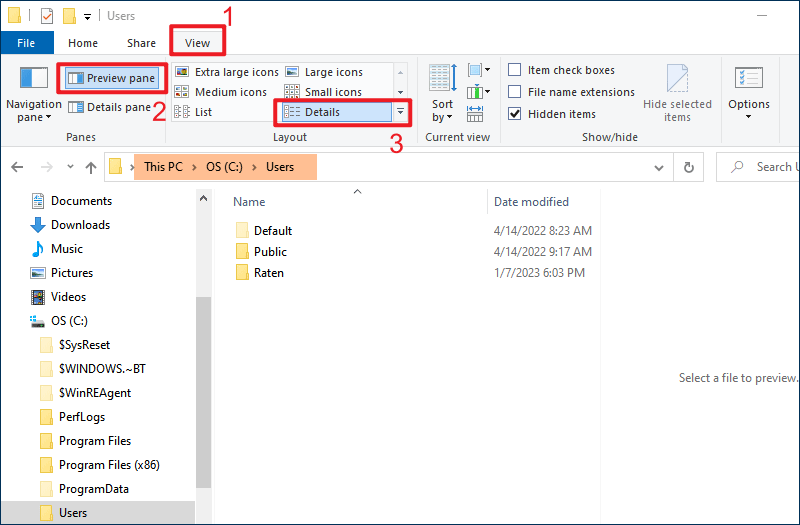
Step 4: Press Windows+E to launch File Explorer and head to this directory: This PC\OS C:\Users.
Step 5: Switch to View tab, click Preview pane from Panes section and choose Details from Layout section.
Step 6: On the Current view section, select Group by and choose Name, then check Ascending.
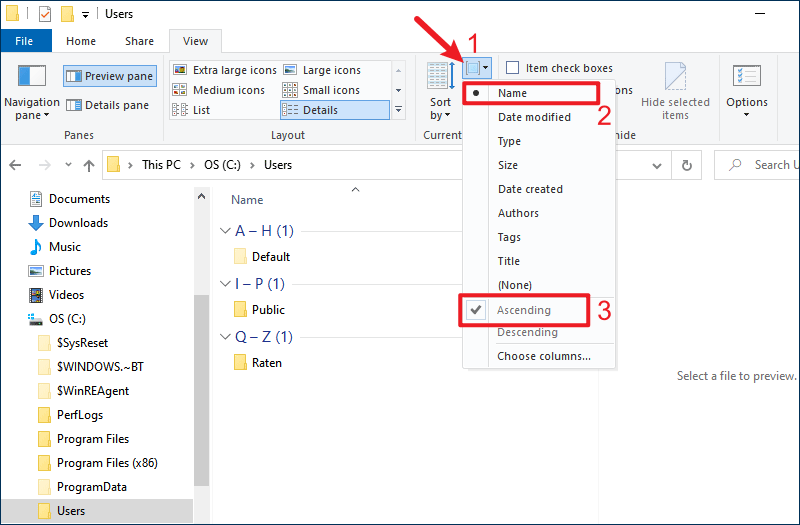
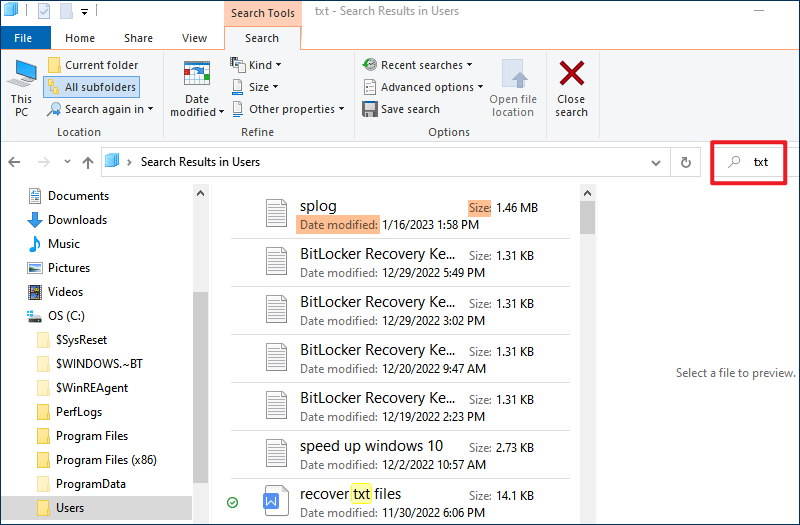
Now you have finished setting up the File Explorer preview, you can then find the duplicate files through searching the file extensions in the Search box. You have to manually check the file with similar names. Compare their details like date modified and use the preview feature to compare their contents. When you discover the duplicate files, delete them.
Option 2: Delete the duplicates with PowerShell
Step 1: Press Windows+X and select Windows PowerShell (Admin) from the context menu.
Step 2: Enter the below command in PowerShell to set the certain location to the folder you want to search for duplicate files: (replace "C:\Users\Raten\Downloads" with your chosen folder)
set-location –path C:\Users\Raten\Downloads
Step 3: To compare the hash value for files in the selected folder, execute the following commands: (replace "C:\Users\Raten\Downloads" with your chosen folder)
ls "C:\Users\Raten\Downloads" -recurse | get-filehash | group -property hash | where { $_.count -gt 1 } | % { $_.group } | Out-File -FilePath
"C:\Users\Raten\Desktop\Duplicates.txt"
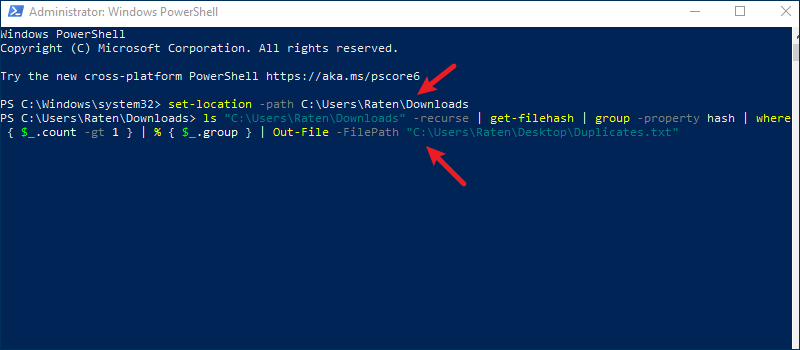
If you get the error message in red, it means that some programs or files under this folder are running in the background or are in use, or that the scan may not have finished yet. You can also change the directory to scan for duplicate files.
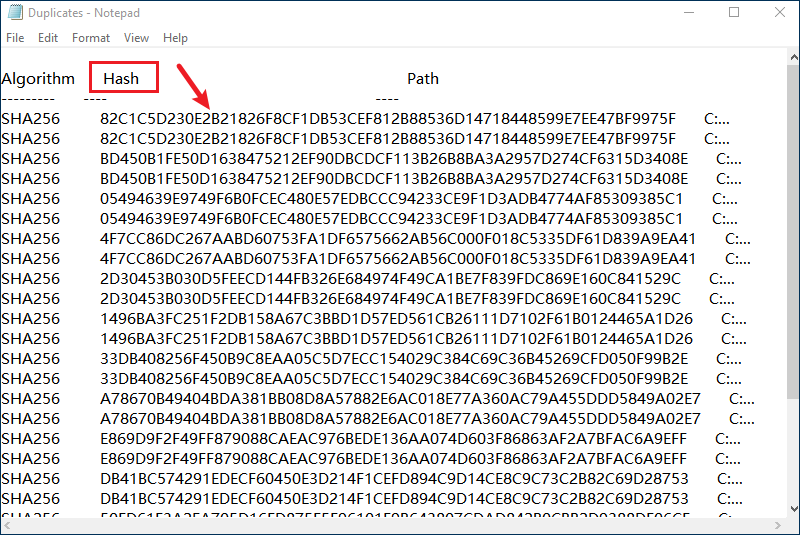
Step 4: Wait a few minutes and check the Duplicates text file on desktop. If two or more files have the same hash value, then they can be a group of duplicates.
Step 5: If you don't want to manually remove the duplicates, input the following command to automatically delete the duplicate files: (replace "C:\Users\Raten\Downloads" with your chosen folder)
ls "C:\Users\Raten\Downloads" -recurse | get-filehash | group -property hash |
where { $_.count -gt 1 } | % { $_.group | select -skip 1 } | del
Note: The auto-delete command does not allow you to choose what files to delete, which can be a bit risky if system files are involved.
Option 3: Clear the duplicates with Cocosenor Duplicate Tuner
If you have tried the above two methods, you will find both of them have apparent disadvantages. The first method is not feasible for users with large volume of files. Manually comparing search results one by one is time-consuming and inefficient when searching only one file type at a time. Chances are that you may miss or delete certain files by mistake. Worse more, you are unable to search multiple hard drive partitions at the same time. If you are not familiar with the command line, it is easy to make mistakes using the second method.
To make it easier and faster to find all duplicate files on the computer, we highly recommend the efficient duplicate file management tool--Cocosenor Duplicate Tuner. It can perfectly eschew all the above disadvantages. This software enables a speedy and accurate scan regardless of volume of files you have. Featured with smart filter options, it allows to exclude or skip specific directories from search. Duplicate Tuner offers cleanup hints and advanced selection of duplicates so that no mistakes can be made. Just one click to remove all the clutters on your device. Here's how it works:
Step 1: Download and install Cocosenor Duplicate Tuner on Windows computer.
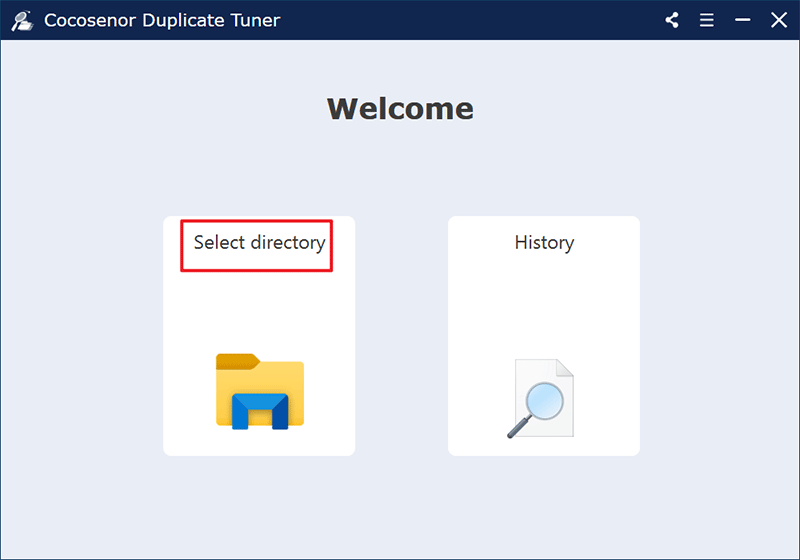
Step 2: Choose Select directory on the home interface after launching the software.
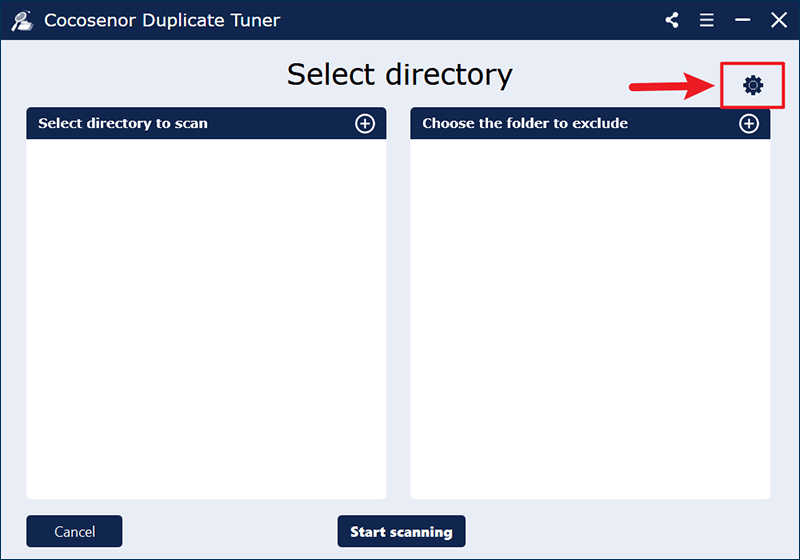
Step 3: Configure scan settings before start searching duplicates.
Click the Settings icon to configure the scan rules.
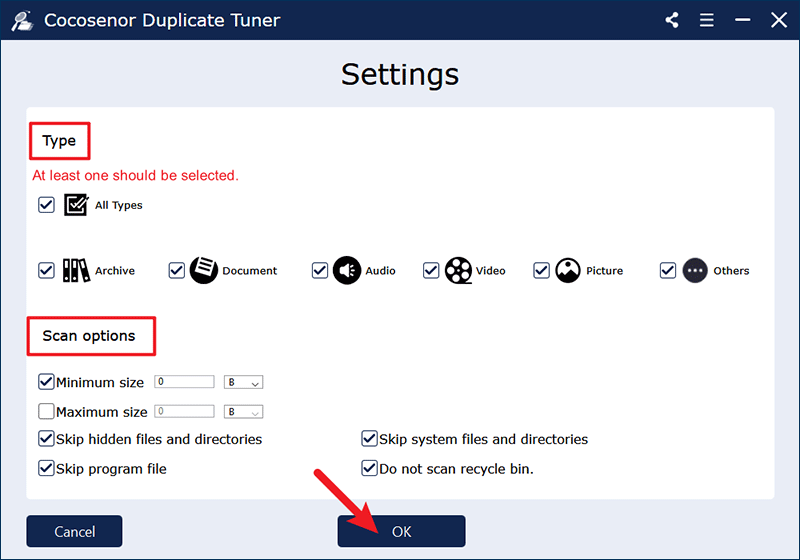
You can customize the file type and size to be scanned here and click OK when you complete setup.
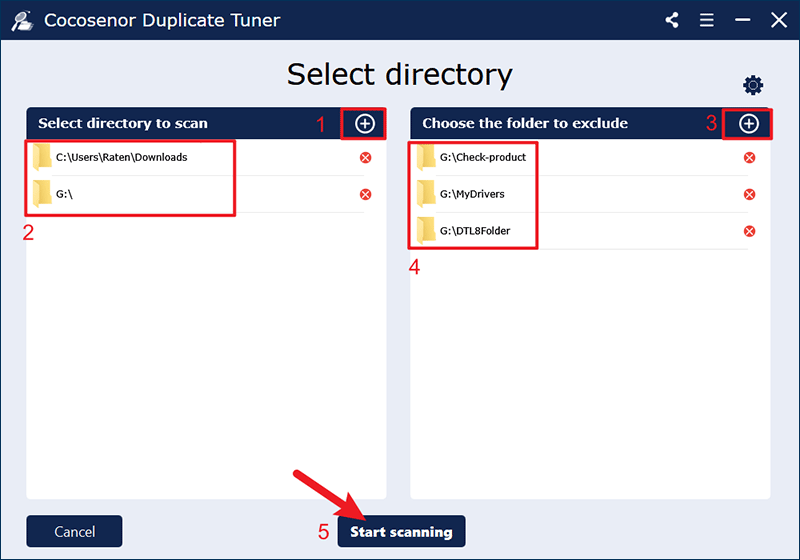
Step 4: Select the folder directories to include and exclude from scanning.
Click the add icon to choose the folders or drive volumes that you want to scan as well as the specific folders that you want to skip during searching process. Then tap on Start scanning. The time required for scanning depends on the volume of files.
Step 5: Select the duplicate files you want to delete and remove them.
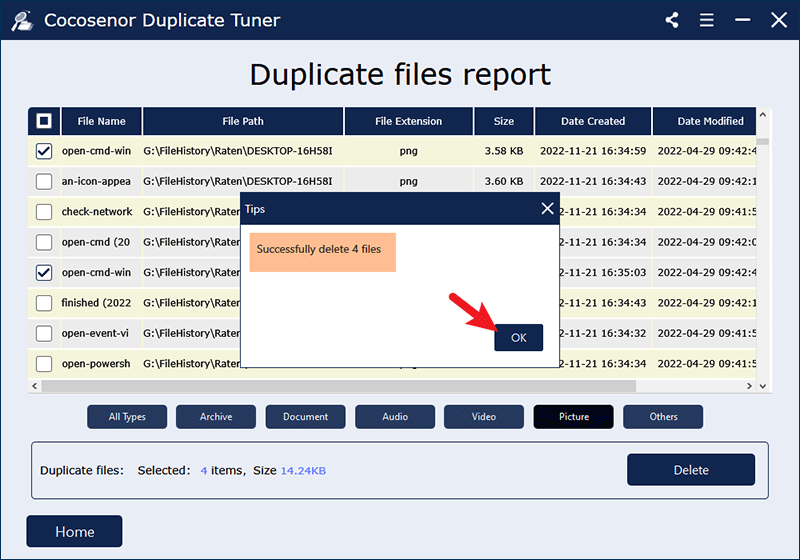
You shall get a duplicate files report after the scan finishes. A group of duplicate files are marked with the same colour and you can check the details like date created and modified. There are seven file type options available under the report, allowing you to display the duplicate files by category.
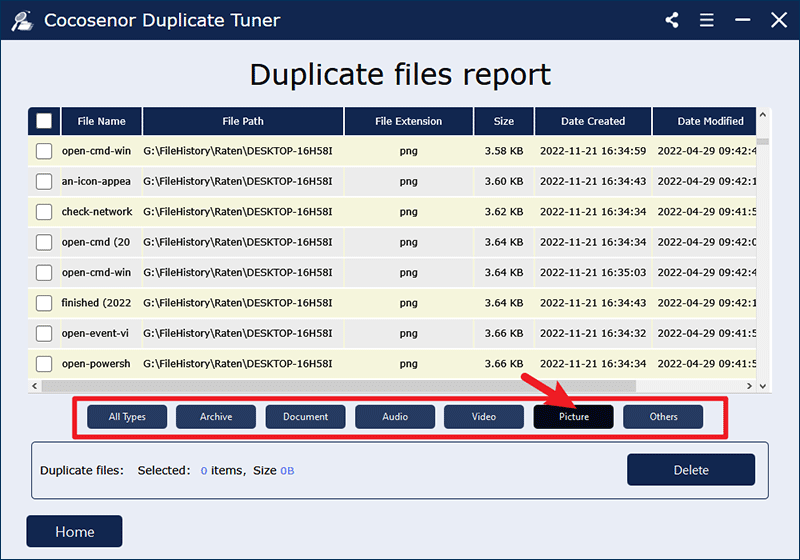
Tick the box next to File Name to auto-select all the duplicates and then hit on Delete. It keeps one file in each group of duplicate files and removes the remaining copies. But if you double click on the checkbox, it will select all the files in the list. Finally, confirm the deletion with a Yes.
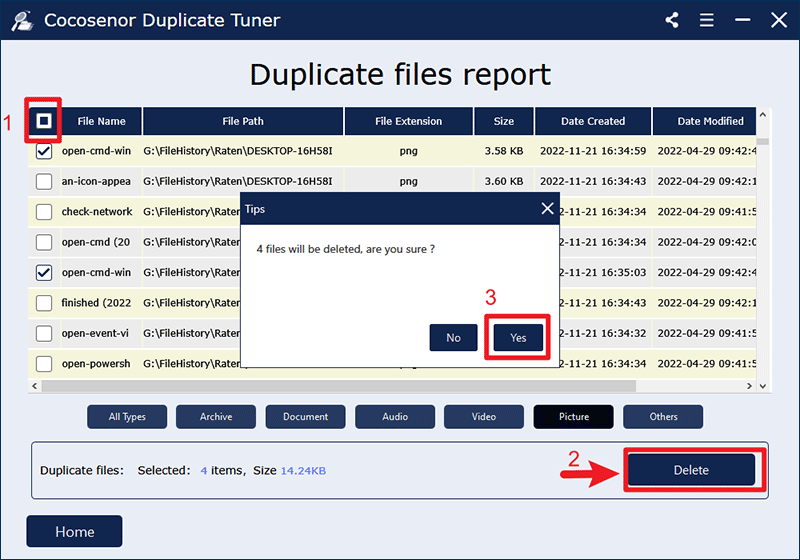
After a while, these useless files will be permanently erased on your device.
